HP VSR1000 - Getting Started
HP’s “VSR1000 Virtual Services Router” is now generally available. This was first announced at Interop Las Vegas in May, but it wasn’t until Interop NYC in September that it started shipping. This post will give a quick introduction to the VSR, and show how to get it up and running using VMware Fusion on Mac OS X.
VSR1K - What is it?
The VSR1000, aka VSR1K, is a software router that runs as a Virtual Machine on VMware ESXi or KVM. It will probably also run on other hypervisors. It supports a broad range of services and protocols - e.g. OSPF, BGP, IS-IS, IPv6, MPLS (VPNs and TE), GRE, IPsec, QoS, etc. It runs Comware v7 - the latest major branch of the software that runs on the HP routers and switches that came from the 3Com acquisition (i.e. not ProCurve). It supports a maximum of 16 vNICs. It is conceptually similar to Cisco’s CSR 1000v.
Those of us who were looking for ways to practise with the Comware CLI will immediately be thinking: Lab! And it will certainly work well in lab environments - if you don’t license it, it will run in a bandwidth-restricted mode. I haven’t found the exact number documented, but my limited testing indicates that 30Mb/s is achievable - this is more than sufficient for a lab.
But we should be clear: This is not just for testing - HP is very serious about this being a realistic choice for production environments. One suggested deployment scenario is using it as a Route Reflector - by increasing the allocated memory, you can support millions of routes. It’s a hell of a lot cheaper to add vRAM, rather than putting more memory into physical routers. It would also work well for remote sites where you want to deploy one or two physical servers, and run VMs on top of them. You can now deploy VSR1000 systems to provide IPsec tunnels back to HQ. No need to deploy specialised router hardware. It would also work well in cloud environments, where you could deploy one or more VSR1Ks to each tenant.
HP offers licensing in 3 variants - 1-, 4- or 8-core models. You pay for the number of cores, but there are no further restrictions. Add more RAM if you need. Run it as fast as you can with your CPUs. No paying for bandwidth like the CSR1000v. HP’s testing indicates this sort of throughput:
| Cores | 1-core | 4-core | 8-core |
|---|---|---|---|
| IPv4 forwarding | 183Kpps | 227Kpps | 200Kpps |
| IPSec performance | 268Mb/s | 580Mb/s | 926Mb/s |
Don’t ask me why the IPv4 packet forwarding rate is lower for 8 cores than 4. Some sort of typo? The numbers vary across HP documentation too - e.g. see these specs. Clearly the IPsec code scales well with more CPUs though.
Pricing seems to be ~$400 for 1 core, $650 for 4 cores, and ~$1,000 for 8 cores. These prices were from a quick web search - don’t take them as gospel. Ask your reseller.
Deploying the VSR
First, download the VSR1k from here. You’ll have to sign in with an HP Passport account - this is free to create, if you don’t already have one. Unpack the ZIP file. It contains three files, plus the Release Notes:
1
2
3
4
5
6
7
$ unzip VSR_7.10.E0101P01.zip
Archive:  VSR_7.10.E0101P01.zip
  inflating: VSR1000_HP-CMW710-E0101P01-X64.ova
  inflating: HP VSR1000_HP-CMW710-E0101P01-X64 Release Notes.pdf
  inflating: VSR1000_HP-CMW710-E0101P01-X64.ipe
  inflating: VSR1000_HP-CMW710-E0101P01-X64.iso
$
We’re going to deploy the OVA file into VMware Fusion 5. You could also do the install by creating a VM, and then attaching the ISO image, and installing from there. Open VMware Fusion, and go File -> Import. Browse to the file VSR1000_HP-CMW710-E0101P01-X64.ova and click Open. You’ll be asked for a location to save the imported file. The default location (~/Documents/Virtual Machines) is probably OK. Click Import. You’ll get a pop-up window that looks like this:

Close this window. You should now see your Import Library:
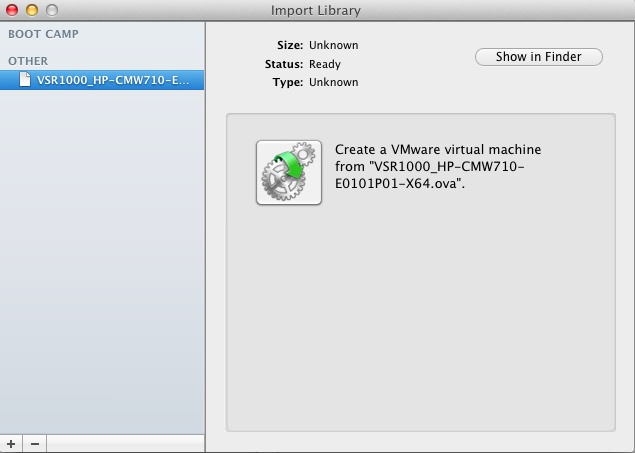
Click on the “Gears” icon. You can then choose the name and location for the new VM. I’m going to use VSR1K_R1 for the rest of this exercise. Click Import. After a few minutes, you’ll have a pop-up showing the console of your new VM.Click the “Spanner” icon, to check/change the VM settings:
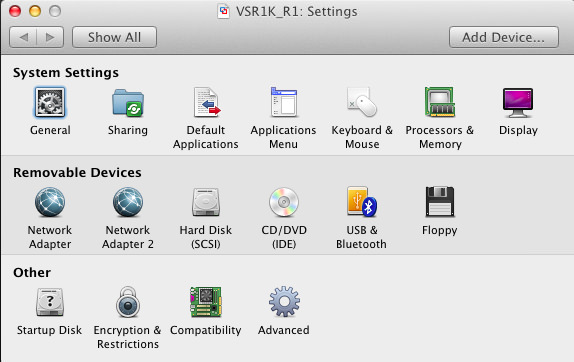
It’s currently set to 1 CPU Core, with 1GB of RAM. The hard disk is 8GB, thin-provisioned. There are two Network Adapters - currently they are both set to Bridged Networking. I want to have one bridged with my Wi-Fi connection, and the other using a private network on my Mac. Let’s change Network Adapter 2 to use a Private Network:
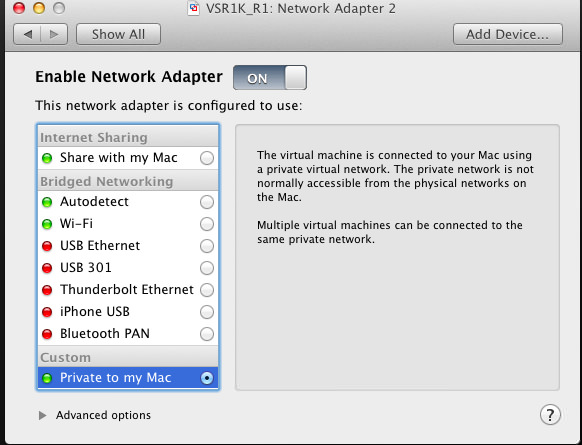
All the other options are OK for now, so let’s power this VM on, and see what happens. You’ll see some boot messages scrolling across the screen, then you’ll probably see it hit this point:
1
2
3
4
5
6
7
8
9
10
Startup configuration file does not exist.
Started automatic configuration, press CTRL_D to break.

Automatic configuration attempt: 1.
No interface available.
Attempt 1 failed. Waiting for the next...

Automatic configuration attempt: 2.
Interface used: GigabitEthernet1/0.
Enable DHCP client on GigabitEthernet1/0.
Enter Ctrl+D, then Enter, and you should see something like this:
1
2
3
4
5
6
7
Automatic configuration is aborted.
Line con0 is available.

Press ENTER to get started.
%Oct 14 17:17:53.172 2013 HP SHELL/5/SHELL_LOGIN: Console logged in from con0.

_
We now have a working router! Well sort of, we need to put some configuration on it to make it do something first.
Configuring for use
If you’re familiar with HP Comware Configuration, you can now start setting up the router however you like. If you haven’t used it before, let’s run through some basic setup. First we’re going to put DHCP addresses on the Ethernet interfaces:
1
2
3
4
5
6
7
8
9
10
11
12
13
14
15
16
17
18
19
20
21
22
23
24
25
26
27
28
display interface brief
Brief information on interface(s) under route mode:
Link: ADM - administratively down; Stby - standby
Protocol: (s) - spoofing
Interface          Link  Protocol Main IP                Description
GE1/0              UP    UP       --
GE2/0              UP    UP       --
InLoop0            UP    UP(s)    --
Null0              UP    UP(s)    --
REG0               DOWN  --       --

sys
[HP]int g1/0
[HP]int GigabitEthernet1/0]ip address dhcp-alloc
[HP]int GigabitEthernet1/0]int g2/0
[HP]int GigabitEthernet2/0]ip address dhcp-alloc
[HP]int GigabitEthernet2/0]quit
[HP]quit
display interface brief
Brief information on interface(s) under route mode:
Link: ADM - administratively down; Stby - standby
Protocol: (s) - spoofing
Interface          Link  Protocol Main IP                Description
GE1/0              UP    UP       192.168.2.121
GE2/0              UP    UP       192.168.225.131
InLoop0            UP    UP(s)    --
Null0              UP    UP(s)    --
REG0               DOWN  --       --
Your exact IP addresses will vary. But now you should be able to ping those addresses from your host system:
1
2
3
4
5
6
7
8
9
10
11
12
13
14
15
16
17
lhill$ ping 192.168.2.121
PING 192.168.2.121 (192.168.2.121): 56 data bytes
64 bytes from 192.168.2.121: icmp_seq=0 ttl=255 time=1.007 ms
64 bytes from 192.168.2.121: icmp_seq=1 ttl=255 time=2.242 ms
^C
--- 192.168.2.121 ping statistics ---
2 packets transmitted, 2 packets received, 0.0% packet loss
round-trip min/avg/max/stddev = 1.007/1.624/2.242/0.618 ms
lhill$ ping 192.168.225.131
PING 192.168.225.131 (192.168.225.131): 56 data bytes
64 bytes from 192.168.225.131: icmp_seq=0 ttl=255 time=1.972 ms
64 bytes from 192.168.225.131: icmp_seq=1 ttl=255 time=0.500 ms
^C
--- 192.168.225.131 ping statistics ---
2 packets transmitted, 2 packets received, 0.0% packet loss
round-trip min/avg/max/stddev = 0.500/1.236/1.972/0.736 ms
lhill$
Great! Now we want to set up SSH, and add a local user so we can login:
1
2
3
4
5
6
7
8
9
10
11
12
13
14
15
16
17
18
19
20
21
22
23
24
25
sys
[HP]ssh server enable
[HP]public-key local create rsa

The range of public key size is (512 ~ 2048).
NOTES: If the key modulus is greater than 512,
It will take a few minutes
Press CTRL+C to abort.
Input the bits of the modulus[default = 1024]
Generating Keys...
+++++++++++++++
++++++++++++++++++++++++
+++
++++++
[HP]user-interface class vty
[HP-line-class-vty]authentication-mode scheme
[HP-line-class-vty]protocol inbound ssh
[HP-line-class-vty]quit
[HP]local-user admin
New local user added.
[HP-user-manage-admin]password simple Password!
[HP-user-manage-admin]service-type ssh
[HP-user-manage-admin]authorization-attribute user-role network-admin
[HP-user-manage-admin]quit
[HP]quit
Don’t worry if you didn’t quite follow all of that. Basically we enabled SSH, generated a key, configured the VTYs to only allow SSH, and to use password authentication. We then created a new user, and assigned them the role “network-admin” - this gives full access to the switch.
Now to test it out:
1
2
3
4
5
6
7
8
9
10
11
12
13
14
lhill$ ssh admin@192.168.225.131
The authenticity of host '192.168.225.131 (192.168.225.131)' can't be established.
RSA key fingerprint is 34:a8:0c:a9:10:cf:78:9c:98:c1:05:5a:f2:fb:a1:d5.
Are you sure you want to continue connecting (yes/no)? yes
Warning: Permanently added '192.168.225.131' (RSA) to the list of known hosts.
admin@192.168.225.131's password:
******************************************************************************
* Copyright (c) 2010-2013 Hewlett-Packard Development Company, L.P. *
* Without the owner's prior written consent, *
* no decompiling or reverse-engineering shall be allowed. *
******************************************************************************
quit
Connection to 192.168.225.131 closed.
lhill$
Thanks to techworldwookie for some of the basic Comware setup notes. Configuration Guides and Command references are available here, if you want to learn more. You can now configure static addresses, routing, VPN tunnels, whatever you need. You can also configure SNMP, and add it to your NMS. In future I might add some more posts about configuring these devices, and trying out the auto-deployment functionality.
Conclusion
I wouldn’t rush into deploying this into production just yet. I would be cautiously testing it out, and making sure that it does what you want. I would definitely be running it in a lab, using it as a learning exercise, and seeing if it will work for you. I think that for many routing applications, virtual routers like this are the future. They offer far greater flexibility and speed of deployment. Crucially, we can add resources like memory and CPU quickly and easy, without a large financial penalty. Get your hands on it, and try it out now!